Should beginners start with a soprano or alto saxophone? The alto saxophone is easier to play than the soprano saxophone, and so it is a good choice for beginners. A simple comparison of the length of the soprano and alto saxophones shows that they are about the same, 70 centimeters long.Example Text
Being a guitarist is a lot like being an athlete. A certain amount of practice has to go toward general maintenance of your playing on both a physical and mental level. You have to do exercises that will keep your skills in a state of readiness, so that when the time comes to go out and play you can do so in the best way possible. There are also times that you might need to regain a level of fitness after a period of inactivity.General fitness is even more critical if improvisation plays a role in your music, since you don’t know specifically what you’ll be playing when you solo. You have to be able to execute the ideas that come to you, whatever they might be. Being in shape makes is more likely you’ll be able to execute those ideas, rather than try and fail.Below, I’m going to go through some exercises that I do to either keep my lead playing and improvisation in shape, or to regain a level of fitness if I’ve been the musical equivalent of a couch potato.
Speed Exercises
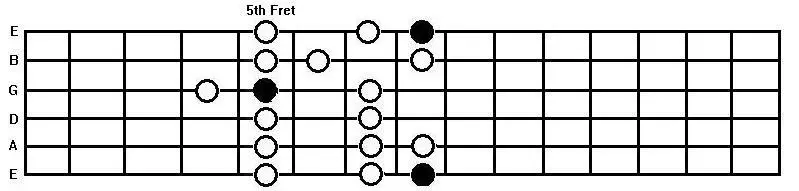
First, I’ll demonstrate some exercises that will keep your fingers moving quickly.I personally choose to center my speed and technique exercises around scales rather than exercises that target more repetitive finger combinations. I figure, since I’m going to be using scales when I solo, I might as well keep the exercises as close to what I’m really doing when soloing.Since there are so many exercises out there that work on speed and technique, you have to be discerning in choosing a way of working on these things that is relevant to the music you will be playing. There are tons of scales out there, so you also have to be specific about which scales you choose to practice, unless you’re trying to put in 10 hour practice days. You should ask yourself:
What scales are you likely to be using in the music you play?
Which patterns of those scales are your strongest and weakest?
Your answers to these questions will tell you which scales to use for these exercises. For the examples I’ll give, I’ll just use this pattern of the C major scale:
Everyone faces his or her own unique set of challenges when learning to play the guitar. Some struggle with synchronizing their strumming hand with their fretting hand while others can’t seem to stretch their fingers far enough when playing chords. But there’s one topic where almost every guitarist faces adversity: the F chord. The F major chord is a particularly challenging chord to play on the guitar because it requires you to make a bar or mini-bar (we’ll get into this later), which makes it hard to execute cleanly. In this guide, we’ll be tackling the dreaded F major from just about every angle so you can master this unruly chord. Why Is The F Chord Important?Before we get into learning how to play the F major chord on the guitar, we need to talk about why this chord is so important. The F major chord is the fourth chord in the key of C major. The key of C major is one of the most commonly used keys on the guitar. This is because all the other chords in the key or easy to play and also because the key has no sharp or flat notes in it making it easy to use to learn music theory. With that being said, let’s get into the first and most common version of the F major guitar chord.How To Play The F Chord with JustinGuitar
Let’s begin by learning the full F major bar chords shape. Yes, this is a bar chord. A lot of players avoid bar chords for as long as possible when first starting out, but beginning to develop the strength and dexterity for these chords early on just puts you a step ahead of the rest. Here’s the shape:
This shape is the one you’ll be using the most long term but it can pose quite the challenge. Your best bet is to work on it while you also make use of some simplified versions of the chord as well. Then over time, this full bar chord F shape can take over the alternatives. When it comes to playing bar chords there are many tips for improving at them. We suggest you take a look at our Bar Chord Survival Guide for an in-depth walkthrough on all things bar chords. Simple F Major Chord Finding the F major bar chord to be a little tough? No problem. We can remove a couple of notes from the bar chord to make it easier to play. To play this shape you’ll need to use a mini-bar on the first two (high E and B) strings. Here’s what this shape looks like:
You might notice that this chord isn’t exactly easy to play either. The key to playing this shape is hand position. If you have any bad technique habits you’ll struggle to make all the strings ring out effectively.
Pull your elbow into your body and place your thumb on the back of the neck. Take a deep breath and release all the tension in your body as you breathe out. Position your fingers and squeeze down on the strings using the proper technique. Look at your fingers and make sure they are coming straight down on the strings. You want to make sure none of the fingers are touching any adjacent strings and stopping those strings from ringing out. And just so you know, these technique tips are helpful for playing any chord. If you find yourself struggling with a different chord in the future, be sure to come back here! This smaller F major chord is not going to sound quite as full as the F major bar chord. Most of the time, that’s okay. But if you want to make the whole full sound of the F chord you’ll need to learn how to play the bar version. F Major Triad If you know anything about how guitar chords are made, then you’ll know that a major chord consists of just three notes. The root, a major third, and a perfect fifth. Many chords we play on the guitar are simply repeating these three notes across a few octaves. So if we strip away all the extra supporting musical information, we can play a chord with just those three essential notes. With the F major chord, we’re playing the notes F (root), A (major third), and C (fifth). These three notes make up what we call an F major triad. You can find this triad shape in a few different places within the full chord shape but the most useful one looks like this:
This shape is incredibly easy to play because your hand naturally already sits on the strings in this position. You can see from the chord diagram above that the three unused strings will need to be avoided or muted when strumming. The amazing thing about this little triad shape is that it’s totally moveable! That means you can move this shape around the neck to play other major chords. This can really help you to move around the fretboard with some purpose. Just pay attention to the note name that the root (black) note lands on and you have the name of your major triad. If you move this shape up to the 7th fret, then the black note will be an A note – making it an A major triad.F Major 7
For the final F major chord alternative, we’ll be taking a look at this lesson by Ayla Tesler-Mabe. This F major 7 trick is considered a chord hack because even though we’re technically making the chord look and sound more complicated, the fingering is much easier. To play this chord shape, we’ll make the F major triad shape you learned earlier but allow the high E string to ring out. Doing this adds an E note to the chord. E is a major seventh above F and adding this note makes our F major and F major 7. Here’s the shape for you:
An F major 7 chord can be played in place of a regular F major chord in many cases. This is especially the case in the keys of C major and F major because they both contain E notes naturally. That allows this chord to fit into those keys diatonically. If you’re playing an F major outside of those keys, an F major 7 won’t always sound right. Use your ears and if it sounds right it is right.Bonus:The Ultimate Bar Chord AlternativeThe last alternative we have for you is a little bit unconventional. Playing over the top of the fretboard with your thumb allows you to have a little more flexibility with the rest of your fingers. A good way to think of it is as a fifth finger that can only be used to fret the low E and A strings. To use this technique you’ll need to switch up your fretting hand grip a little bit. Instead of placing your thumb on the back of the neck while you chord, you’ll need to grab the neck like a baseball bat. This allows your thumb to come over the top and reach those thicker strings. Be sure to check out the video to get more tips and tricks for this alternative bar chord technique. What’s Next?5 Easy Songs For BeginnersIn this lesson, Ayla Tesler-Mabe shares 5 easy songs for beginners on the guitar. You’ll learn how to play American Girl by Tom Petty, Bad Moon Rising by CCR, Hotel California by The Eagles, Like A Stone by Audioslave, and Little Lies by Fleetwood Mac. There are even downloadable PDF chord charts available for you.Changing Chords SmoothlyHere’s a lesson from Nate Savage that focuses entirely on tips and tricks for changing between simple guitar chords. Practice along to the downloadable MP3 jam track so you can master your chord transitions while having fun on the guitar.Want To Go Beyond Beginner?Have you ever thought about what it takes to take your guitar playing to that next level? In this lesson Ayla teaches you about the 3 big things you need to be focusing on to graduate from your beginner status on the guitar.
Holding the MandolinYour mandolin should be balanced in such a way that you don’t have to struggle to reach any of the notes. Your right hand should be free to change your picking and strumming as necessary.The three main balance points are the left-hand thumb, which guides the neck of the mandolin gently skyward; the diaphragm, which acts as the central stabilizer; and the spot just below the inside of the right elbow, which anchors the instrument without restricting movement of the wrist or elbow needed for picking and strumming.Using a PickOnce you’ve balanced your mandolin, you’ll need to establish a functional picking technique. Curl your index finger and lay the pick across it, so that approximately ⅛” extends past your finger. Place your thumb flat across the face of the pick, firmly pressing it against the index finger. The flat bottom portion of the index finger (along the surface of the nail) and the bottom of the thumb should be parallel relative to each other as well as to the ground.When strumming chords, you’ll want to use a looser grip to allow the pick to glide smoothly across each string. When playing single notes, you’ll need a firm grip to drive completely through each doubled string, thereby producing a fuller tone.Fretting With AccuracyBecause the mandolin has four sets of doubled strings, you’ll need more finger pressure than you would with most guitars, ukuleles, and the like. That said, producing a quality tone is more about accuracy than strength.To ensure that each doubled string is sounded properly, hold the string down as close as possible to the fretwire without actually being directly on top of it. The contact point of the string to the fretwire is what actually produces the pitch that you hear (shortening the vibrating string to that point), necessitating left-hand accuracy.Producing Quality ToneNow that you know how to use the pick and the left hand, it’s time to put it all together. That means mastering pick technique on open strings (including string skipping) and incorporating fretted notes with scales and simple tunes.You’ll need to practice driving through each doubled string with upstrokes as well as downstrokes before adding fretted notes. Next you’ll want to try the first five notes of the G major scale, ascending and descending, using alternate picking throughout. Fret numbers are as follows: (4th string, “G”) 0, 2, 4, 5, 7. Once you’re able to play the first portion of the major scale ascending and descending on the G string, try the two-octave scale, which utilizes all four strings. Don’t forget to use your 4th finger.Now that you have these key tips on how to play mandolin, you’ve got all the tools you need to hit the woodshed. Have a blast!
My first bass was terrible — a splintery hunk of plywood with barbed wire for strings and frets that would cut you for looking at them the wrong way. Luckily for you, many of today’s entry-level basses are light years better than my old albatross was, and with a little research, you’ll see there’s no reason to own a bass that hurts you when you play it, or one that costs too much.Yamaha RBX170.Yamaha TRBX174.Take the Yamaha RBX170 and TRBX174 basses, for instance. Both deliver the goods right out of the box, with lots of swagger, gobs of tone, solid construction and an affordable price. They’re easy to play too, thanks to their low string height, comfortable neck profiles and ergonomic balance. These are the key attributes that keep aspiring players inspired, rather than deterred, by their instrument.If you already own a beginner’s bass that doesn’t speak to you when you pick it up, you might consider upgrading to an intermediate instrument like the Yamaha BB234 (or its 5-string cousin, the BB235.) It’s a true workhorse, with classic looks, durability, sweet sounds and the kind of playability that serious musicians expect and deserve.
Yamaha BB234.
2. You’ll Need a Real Amplifier Too
Today’s amps and speaker cabinets are light enough to wheel around with one hand and small enough to sit next to you in the back seat of a taxi … but powerful enough to blow the doors off of any room. Bigger isn’t necessarily better, so ignore refrigerator-size rigs and look carefully for a combo (amplifier and speaker combined in a single footprint) or an amp that marries the tone-shaping capability and power you need with a high-quality 2 x 10″, 1 x 12″ or 1 x 15″ cabinet. One good option in the latter configuration is the Ampeg™ Rocket Bass RB-115. It’s got that classic beefy Ampeg sound in a portable, easy-to-transport package.
Ampeg Rocket Bass RB-115.
By the way, when it comes to amplifiers, know this: Your parents or roommates won’t be disappointed if said bass rig comes with a headphone output jack.
3. Find a Good Teacher and Commit to Taking Lessons
There’s no better way to get started than under the wing of someone who knows more than you do and has the patience to guide you through the struggles you’ll encounter. The right teacher will be able to assess your strengths and weakness, show you proper techniques for playing, provide you with encouragement, and challenge you regularly with observations, insights, theory and practical exercises that feed your passion and push you to grow and achieve new heights.
4. Learn How to Read Music
See above. A good teacher can help here, as can online lessons. True, there’s no law that says you can’t play the bass if you don’t know how to read music, and in fact, there’s something commendable about taking a non-traditional path toward achieving your goals. But ideally you want to be able to balance raw genius with knowledge and ability, and illiteracy of any kind will hold you back.Don’t wait to get started, either. It may feel like slow going at first, but once you get it down you’ll have access to a language that only other musicians can speak. Make sight reading a priority early on to speed up your growth and open up doors — both musical opportunities and creative insights — that might otherwise remain shut.
5. Purchase a Tuner
If your bass isn’t in tune, chances are you’ll get lots of sour looks from bandmates and audience alike. Fortunately, it’s easy to do, even if you don’t have a particularly good ear: Simply buy a clip-on tuner such as the Yamaha GCT1. These small, inexpensive devices attach to your bass’ headstock and provide on-the-go tuning capability whether you’re on stage, in the rehearsal room or practicing on your own.
Yamaha GCT1.
6. Make Sure Your Bass Is Set Up Correctly
A proper bass setup includes striking the preferred balance between string height, saddle height and neck bow to make your bass play comfortably and ensure that it’s correctly intonated (i.e., so it plays notes in tune over the entire length of the fretboard). Most music stores have a luthier who can do this for you (if not, they can probably refer you to one), but if you’re handy you can consider doing it yourself. (A word to the wise: If you’re going to go the DIY route, make your first attempt on an inexpensive instrument.)
7. Practice, Practice, Practice
There is no substitute for regular, consistent practice, both alone and with others. Play until your fingers feel like they’ll fall off, and do it again the next day and the next until callouses start building up on your fingertips and your stamina increases. You can only get better by running through finger exercises and scales, as well as practicing grooves and patterns to a metronome in order to help you internalize your sense of time and accuracy.Challenge yourself by playing along with recordings of bassists whose playing you admire, and push yourself hard to figure out complex lines in odd meters. Learn how to play the same pattern in different locations up and down the neck. And when you feel ready, take every opportunity you can to play with other people, particularly if they’re better than you are.
When I bought my first ukulele I was completely unprepared, but I had the benefit of some guitar background. I’ll try to give you some really useful tips that will give you a jump-start when you start playing the ukulele. Be sure to check out the things to know before you buy and ukulele buying guide as well.
1. Get a decent ukulele
This is the most important tip of all for ukulele beginners if you are serious about wanting to learn how to play the ukulele. There are a few good ukuleles in the $100 range, but you can be almost sure that an ukulele under $50 will not be very good. The main issue you will have is that it won’t to stay in tune.I’m speaking from experience. I bought a $45 “Harley Benton” soprano once and it couldn’t keep the E string in tune even for one strum. So be warned! Check out the ukulele buying guide to get the right ukulele for you — different ukuleles listed for all budgets — and, if you have the chance, try some ukuleles in your local music shop.
2. Learn how to hold your ukulele
This may sound stupid but it will come in really handy in the future! Take a few minutes to try some positions, either sitting or standing.
When you are sitting down, you can let the body of the ukulele rest on your leg. Rest your strumming arm on the top of the ukulele. The neck of the ukulele should be “floating” in the air. When you are standing up, you can hold it against your chest and keep it there with your strumming arm.All this may take some practice, but it will pay off in the end because you will be able to pick up your ukulele and play – even when walking around – without messing about first. In my opinion, a strap is unnecessary and it just adds bulk to the ukulele. In some cases a strap might come in handy though. Check out how to add a ukulele strap to your ukulele without drilling.I had some trouble at the beginning, but nowadays I walk around the house, go out into the garden or whatever with my ukulele. Here’s another quick tip: don’t hold it too tightly! The sound still needs to vibrate properly through the body.
3. Have fun!
The ukulele is a fun instrument. Some may call the ukulele a toy, but so what? Toys are fun to play with! But it really isn’t a toy at all, it’s a genuine instrument and you can do wonderful things with it. Don’t make the mistake of thinking that it is an easy instrument either. You will need a lot of practice to master it, but you will have so much fun even if you only know the basics!Enjoy playing it and before you know it, you will have made great progress. Another very important ukulele tip for beginners: don’t give up too easily!
4. First things first: the basics
It only takes a quick look at YouTube and other websites to realise that amazing things can be done with the ukulele, but as with every skill in life, you’ll need to start by learning the basics.
Don’t try to play big fancy tabs when you are just starting out. Learn your basic chords instead. Start with the majors and minors and then go on to other chords. The UkuTabs chords chart is perfect for this, since it gives you a very decent overview of all the major chords.You will notice that once you know your chords, you will be playing tons of songs without even thinking twice about how to play them. Also check out the UkuTabs Chord Library to see how to play every ukulele chord possible.
5. Decent strumming makes all the difference
At the start you’ll probably only be doing simple up and down, up and down, up and down. But after a while you can try to add some slapping and palm muting to really get that chunky, funky, groovy feeling. I won’t explain how to strum in here, but feel free to take a look at The Ultimate Strumming Guide.Wondering why there aren’t any strumming patterns posted along with songs? Well, that’s a whole other story. It is forbidden by the MPA (Music Publishers Association) due to copyright issues. They say it is not allowed to share the instructions for how exactly to play a song online. So strumming patterns (rhythm and tempo) can’t be shared at all and I’m afraid there isn’t much I can do about that.It will really help a lot if you try to figure out the strumming yourself. You will learn to play the ukulele a lot quicker and after a while you’ll come up with your own strumming patterns! Listen carefully to the song and “feel” the rhythm. I know this isn’t easy, but once you get the basics, you’ll be able to do it really quickly.
Ukulele tips for beginners: 6 to 10
6. Use UkuTabs.com to learn songs
Ha, so this may sound silly but it is actually one of the best ways to learn new songs, since each song on UkuTabs has the chord diagrams for every chord in that song. That way you won’t have to look up the chord diagrams.
What is more, if you hover over a chord in the song itself, the chord diagram will pop up! You can also transpose the key of a song to make the chords easier.
7. Play as slowly as you can
Once you have mastered your basic chords and can do some basic strumming, you can eventually start changing between chords. Practice this a lot and with many different chords. At first, do it as slowly as you can so that you can’t possibly make a mistake. Remember that the most important thing is to be accurate, not quick! The same applies when you are starting out with tablatures. Make sure you get a clean sound with no buzzing and muting. Start with slow, easy songs with easy chords and not too many chord changes. Gradually speed up and try more difficult songs.
8. Listen to ukulele players and play along
Already in a band? Perfect! Bring your ukulele along and jam with your friends. Not in a band yet? No problem either: all you have to do is convince your friends to start playing the ukulele! And if that doesn’t work, turn on your computer, go online and watch ukulele videos that you can play along with. Or marvel at the real ukulele gurus out there! All of this will help you to feel the ukulele “groove”. Watch and listen carefully for tempos and rhythms and before you know it, you’ll be learning how to play the ukulele!
9. Record yourself playing and listen to the recordings
I got this tip from the UkuleleHunt (maintained by Alistair Wood). It’s difficult to play and listen to yourself at the same time. Quite often, just noticing what you’re doing wrong is enough to fix the problem. It also gets you used to playing in front of the mic – so it is less of a big deal when you want to record yourself properly.
10. Fingering exercises
This might seem a lot of work. Besides learning chord shapes, how to strum, how to change chords quickly, etc., you’ll also need to do some fingering exercises. This will help you gradually build up calluses on your fingers (= toughened areas of skin which have become relatively hard and thick due to repeated friction or pressure).This may sound like a weird thing to want to do, but it will help a lot in the end. One thing you will soon learn is that when you start playing stringed instruments, your fingers will hurt! Not as much with nylon strings as with steel stringed instruments, though. As your calluses develop, you’ll notice that your fingers hurt less. I have found the exercise below by Faye Hicks to be really good.
Pluck the first string open, then with your index finger on (actually just behind) the first fret, then with your middle finger on the second fret, then with your ring finger on the third fret and finally with your pinkie finger on the fourth fret. Do the pinkie one twice and then work your way back down: ring finger on third fret, middle finger on second fret, index finger on the first fret, then open. Now move to the second string and repeat the pattern. Then the third string, then the fourth. Run through that a few times at the beginning of each practice. Not only will it toughen up your fingertips, it will limber up your fingers. You can also use this exercise to limber up your right hand too – by practicing different finger picking exercises as you do it. The second thing I found that helped in the early stages of toughening up the fingertips was to play for a short length of time (e.g. 10 to 15 minutes) several times a day, instead of playing for one long session (60 to 90 minutes).
You need to play at least 10-15 min every day to build up those calluses. So even if you only have time to run through the exercises a few times, do it! Your fingers will thank you later on. Two good books with tons of exercise snippets and tips are “Ukulele Aerobics” by Chad and of course “Ukulele Exercises for Dummies” by Brett and Al.
An extra ukulele tip for beginners: number 11
11. One final tip
Your fingernails should be cut VERY short on your fretting hand! This is vital if you want to get a clean sound, because you need to press the strings with the very tips of your fingers. On your strumming hand however you can let them grown, definitely if you’re into fingerpicking.
This is a generic blog article you can use for adding blog content / subjects on your website. Edit your Blog articles from the Pages tab by clicking the edit button.
There is no short cut to becoming a good player. Being constant in your practice is perhaps the main secret. This reminds me of Aesop's fable about the Tortoise and the Hare. Some talented young players did not reach their potential as guitarists because they were getting by on talent and didn't put in the daily work. Others have surprised us and reached much farther than we would have expected because they have put in the continued work. So the only short cut is to practice every day, be constant. With tenacity and perseverance you will be able to make beautiful music on the guitar. AESOP'S FABLE: THE TORTOISE AND THE HARE. Once upon a time a hare saw a tortoise walking slowly along and began to laugh and mock him. The tortoise challenged the hare to a race and the hare, thinking himself the fastest animal around, accepted. They agreed on a route and started off the race. The hare shot ahead and ran briskly for some time. Then seeing that he was far ahead of the tortoise, he thought he'd sit under a tree for some time and relax before continuing the race.
He sat under the tree and soon fell asleep. The tortoise, plodding on, overtook him and finished the race. The hare woke up and realized that he had lost the race.
The moral, stated at the end of the fable, is, "Slow and steady wins the race." David Russell.
This is a generic blog article you can use for adding blog content / subjects on your website. You can edit all of this text and replace it with anything you have to say on your blog.
There are different styles of ligatures. My ligature goes with the screw at the bottom, but if you’ve got one of those cloth ligatures, perhaps the screw goes at the top. You’ll be able to see which way it fits. So slide your ligature onto your mouthpiece, and then once it’s on there, we’re going to slide the ligature up a little bit and then the flat face of the reed, the flat face of the mouthpiece. Now fit the reed. Slide the thick end of the reed onto the mouthpiece, going underneath the ligature. The flat side of the reed goes against the flat side of the mouthpiece. What we’re aiming for is to get that reed so that it’s even on both sides of the mouthpiece and also just a fraction below the tip of the mouthpiece.
h anything you have to say on your blog. You can also change the title listed above and add new blog articles as well.
Edit your Blog articles from the Pages tab by clicking the edit button.